Creating cave music
Randomly generating cave music in Pikmin 2 needs to have two files: a .bms (sequence) file, and a .cnd (conductor) file.
The BMS file type is a sequenced music format used in many games. For the cave music in Pikmin 2 however, it is specially-formatted. It mainly contains many short snippets of musical information to be randomized.
The CND files are the actual "songs"; they take specific groups of snippets from a BMS file, and endlessly puzzle-piece them together to form a coherent piece of music.
This guide will function as a walkthrough for creating your own randomly sequencing cave song. All of the editing will be done in hexadecimal.
Requirements:
- A basic understanding of hexadecimal, and a hex editor. An editor that can dynamically resize the window is ideal. (Hex Fiend on Mac OS is a fantastic example).
- A DAW to create your own short MIDIs in, like FL Studio or Logic Pro. A DAW is also great for sketching out your song ideas/song's structure beforehand.
- A MIDI to BMS converter, like flaaffy. You will be generating a lot of tiny BMS files, to turn them into "gestures".
Contents
Overview of file functions
Here are some infographics that you can reference at any time.
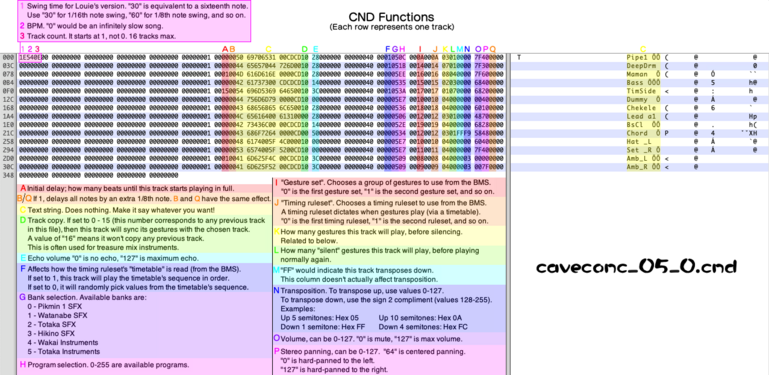
Conductor file functions.
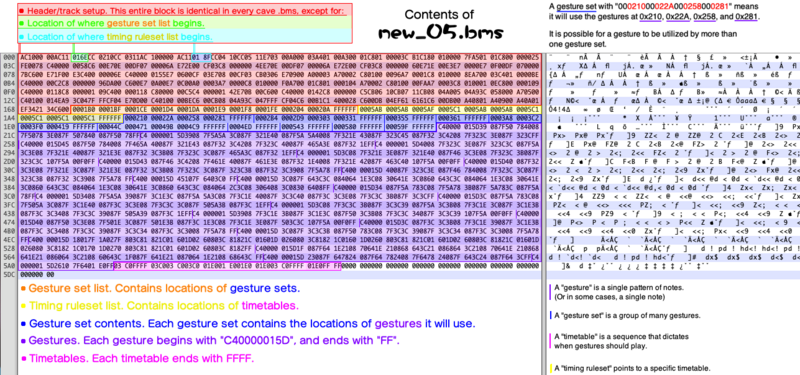
How information is stored in a BMS file.


Setting up your BMS file
Starting with a completely blank BMS file, begin by pasting the following:
AC100000 AC11016E CC0210CC 0311AC10 0000AC11 01E0CC04 10CC0511 E70300A0 0003A401 00A30001 C8010000 3CB1C180 0100007F A50101C8 00000025 FE0078C4 00000058 C600E70E 00DF0700 006AE72E 00CF03C8 0000004E E70E00DF 0700006A E72E00CF 03C80000 0060E71E 00E3E700 00E70F00 DF070000 7BC600E7 1F00E3C4 0000006E C4000001 55E70600 CF03E708 00CF03CB 0306E709 00A00003 A70002C8 01000096 A70001C8 0100008E A70003C4 010000BE C4000000 C2C80000 0096DA00 C600E70A 00E70C00 A00003A7 0000C801 0000F0A7 0001C801 000104A7 0002C801 0000FAA7 0003C801 00010EC8 00000109 C4000001 18C80000 0109C400 000118C8 000000C5 C4000001 42E70B00 C600C400 000142C8 000000C5 CB0610CB 0711CB08 04A00504 A93C0580 00A70500 C4010001 4EA93C04 7FFFCF04 E70D00C4 010000BE C600CB08 04A93C04 7FFFCF04 C600B1C1 400028C6 00DB04EF 616161C6 00DB00A4 0801A409 00A40A01 EF342134
Every cave music BMS begins with this same information.
Gesture set list
Right after EF342134 will be a list of every gesture set's location in the BMS. This section begins with C600. Each entry is the gesture set's hexadecimal location (offset), and each entry in the sequence begins with a "00". FFFFFF indicates the end of this list.
Here is an example of how this sequence should be formatted:
C600 0001B0 0001BF 0001CE 0001D4 0001DA 0001E9 0001F8 0001FE 000204 00020A FFFFFF
Gesture set "0" will be at offset 0x1B0, gesture set "1" will be at offset 0x1BF, gesture set "2" will be at 0x1CE, and so on. There are a total of 10 gesture sets listed in the above sequence.
Until we create our gesture sets, let's use 00AAAA as placeholders so we can easily find and get back to this section later on. You can have as many gesture sets as you like, but we'll create just 16 of them for this tutorial. You may insert this into your BMS:
C600 00AAAA 00AAAA 00AAAA 00AAAA 00AAAA 00AAAA 00AAAA 00AAAA 00AAAA 00AAAA 00AAAA 00AAAA 00AAAA 00AAAA 00AAAA 00AAAA FFFFFF
Our BMS should now currently look like this:
AC100000 AC11016E CC0210CC 0311AC10 0000AC11 01E0CC04 10CC0511 E70300A0 0003A401 00A30001 C8010000 3CB1C180 0100007F A50101C8 00000025 FE0078C4 00000058 C600E70E 00DF0700 006AE72E 00CF03C8 0000004E E70E00DF 0700006A E72E00CF 03C80000 0060E71E 00E3E700 00E70F00 DF070000 7BC600E7 1F00E3C4 0000006E C4000001 55E70600 CF03E708 00CF03CB 0306E709 00A00003 A70002C8 01000096 A70001C8 0100008E A70003C4 010000BE C4000000 C2C80000 0096DA00 C600E70A 00E70C00 A00003A7 0000C801 0000F0A7 0001C801 000104A7 0002C801 0000FAA7 0003C801 00010EC8 00000109 C4000001 18C80000 0109C400 000118C8 000000C5 C4000001 42E70B00 C600C400 000142C8 000000C5 CB0610CB 0711CB08 04A00504 A93C0580 00A70500 C4010001 4EA93C04 7FFFCF04 E70D00C4 010000BE C600CB08 04A93C04 7FFFCF04 C600B1C1 400028C6 00DB04EF 616161C6 00DB00A4 0801A409 00A40A01 EF342134 C60000AA AA00AAAA 00AAAA00 AAAA00AA AA00AAAA 00AAAA00 AAAA00AA AA00AAAA 00AAAA00 AAAA00AA AA00AAAA 00AAAA00 AAAAFFFF FF000000 00000000 00000000 00000000 00000000 00000000 00000000 00000000 00000000 00000000 00000000 00000000 00000000 00000000 00000000 00000000
You can also add an entire row of padding/zeros after this. You can do this for each section, to better visually separate them.
Timing ruleset list
This is another sequence of offsets. These reference "timetables", which will be located at the end of our BMS file. FFFFFF indicates the end of this list.
Here is an example of how this sequence should be formatted:
0005AB 0005AB 0005AF 0005C1 0005AB 0005AB 0005C1 0005C1 0005C1 0005C1 FFFFFF
Timing ruleset "0" will use the timetable at 0x5AB, timing ruleset "1" will use the timetable at 0x5AF, timing ruleset "2" will use the timetable at 0x5C1, and so on. There are a total of 10 timing rulesets listed in the above sequence.
Let's use 00BBBB as placeholders again, and create 16 of them. Insert this anywhere into your BMS:
00BBBB 00BBBB 00BBBB 00BBBB 00BBBB 00BBBB 00BBBB 00BBBB 00BBBB 00BBBB 00BBBB 00BBBB 00BBBB 00BBBB 00BBBB 00BBBB FFFFFF
Gesture set information
A gesture set is a group of many gestures.
Here, we list each gesture set's contents (which are... the locations of gestures!). Each gesture set begins before the 00 and ends with FFFFFF.
Here is an example of how the gesture set list should be formatted:
000210 00022A 000258 000281 FFFFFF 0002B4 0002D9 000303 000331 FFFFFF 000355 FFFFFF 000361 FFFFFF 0003A8 0003C2 0003F0 000419 FFFFFF 00044C 000471 00049B 0004C9 FFFFFF 0004ED FFFFFF 000543 FFFFFF 000580 FFFFFF 00059E FFFFFF
There are 10 gesture sets listed above. The first gesture set has 4 gestures, located at 0x210, 0x22A, 0x258, and 0x281. You can have any amount of gestures in a gesture set; even 1 is fine.
You can paste the following placeholder information for now:
00CCCC 00CCCC 00CCCC FFFFFF 00CCCC 00CCCC 00CCCC FFFFFF 00CCCC 00CCCC 00CCCC FFFFFF 00CCCC FFFFFF
You can expand this list at any time upon adding more gestures/gesture sets, so it might be a good idea to leave a lot of padding/zeros after this.
How is your BMS looking?
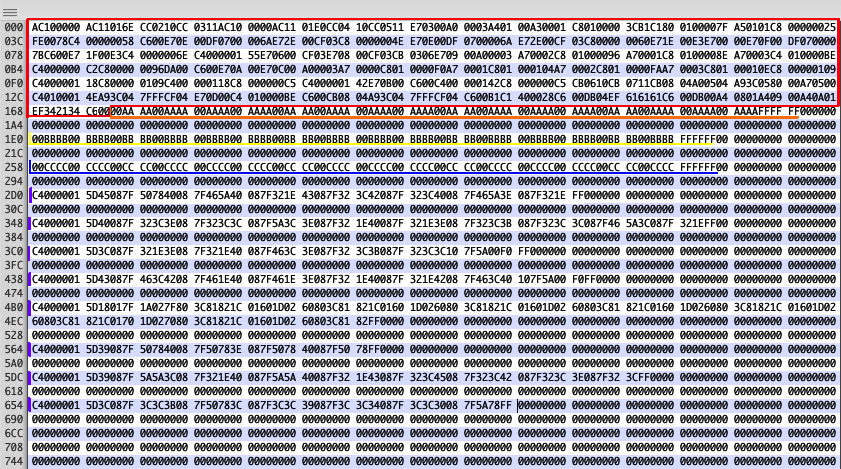
If you have been copy-pasting everything correctly, your BMS will look something like this:
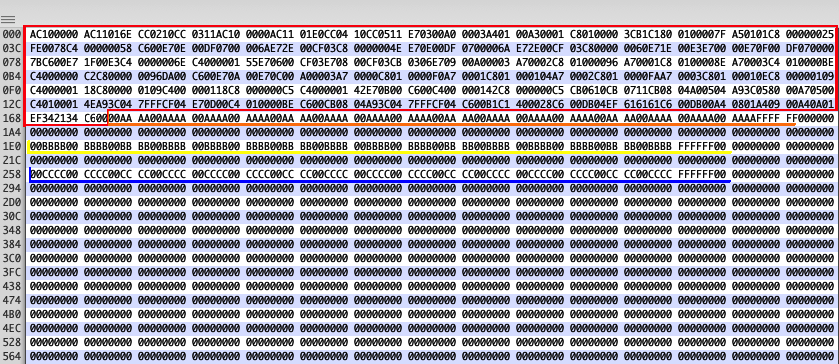
Orange is "gesture set list", green is "timing ruleset list", and blue is "gesture set information"

Once again, you can add as much padding between each section as you want, it will work fine.
Creating gestures
First, you should sketch out your song idea in your DAW, and then cut your song into tiny blocks. These blocks will be your song's individual gestures. You should also consider dragging these blocks around in various arrangements to make sure they sound good in any order.
Once you are ready, have them nicely organized and ready to be exported into individual MIDI files:
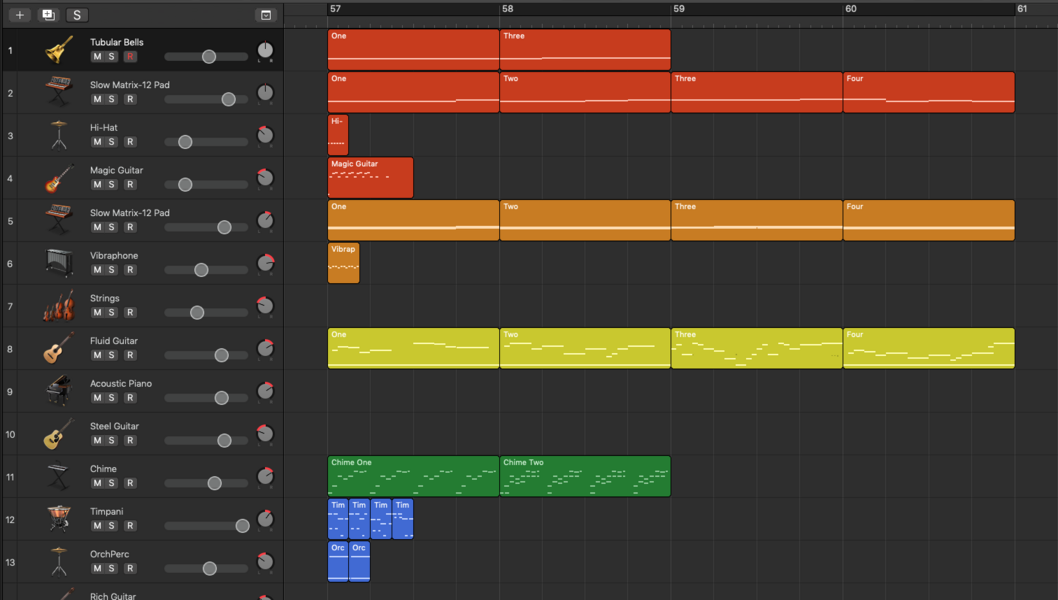
A Logic Pro project with a bunch of short blocks of music. Each block will be a "gesture".

For some reason, imported BMS files play 4 times as slow in cave songs. If you import these gestures as is, they will play 4 times as slow.
So before you export your gestures, you need to modify your gestures to run 4 times as fast. How you will go about this will depend on your DAW; some will allow you to stretch entire regions of notes easily.
Logic Pro can easily speed up MIDI regions with MIDI Transform. You want to use the "Double Speed" transformation twice on each block.
Shorten the length of the MIDI by 4x, but don't change your project's tempo.

Inserting gestures
Gestures use same the note/music information as standard BMS songs.
You should have converted all your MIDIs into BMS files. Open up one of your converted BMS files, and look for the first note/pitch value. If you used flaaffy, this will most likely be at 0x1D. Copy this note, all the way to the end of the sequence, which should be FF.

The value "2D" here is the very first note of the sequence. Copy this, all the way to "FF".

To add your gesture, start it with C40000015D, then paste in what you copied. Each gesture should end with that FF. Add as many gestures as you please!
The purple lines indicate where a gesture starts.

Inserting timetables
A timetable is a sequence that dictates when gestures should play. A timetable ends with FFFF. You can make a timetable as complex as you like.
Some examples of timetables you can use are:
0780FFFFPlay a gesture every 16 beats.03C0FFFFPlay a gesture every 8 beats.01E0FFFFPlay a gesture every 4 beats.03C003C003C001E001E001E001E003C0FFFFThis sequence will play a gesture every 8 beats (3x), play a gesture every 4 beats (4x), then play a gesture for 8 beats (1x), in that order.00F0FFFFPlay a gesture every 2 beats.0078FFFFPlay a gesture every 1/4 a beat.003CFFFFPlay a gesture every 1/8 a beat.001EFFFFPlay a gesture every 1/16 a beat.003C0078001EFFFFThis sequence will play a gesture for 1/8 a beat, play a gesture for 1/4 a beat, then play a gesture for 1/16 a beat, in that order.
You can insert your timetables anywhere at the end of your BMS.
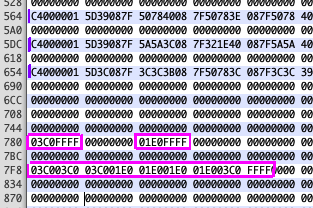
Each timetable has a cyan box around it.

Filling in info
Once you have your gestures and timetables inserted, go back and fill in those 00AAAA, 00BBBB, 00CCCC placeholders with the locations of your gesture sets, timetables, and gestures you want to use. A gesture set list, timing ruleset, and gesture set begins on the 00.
Also in the very beginning of your BMS, make sure the value at 0x14 has the location of where your timing ruleset list begins.

Put the location of where the "timing ruleset list" begins here.

Filling in the conductor file

Conductor file functions.
In your song's associated conductor file, try to stretch out the window so that the instrument names are all in the same column if you can, like in the image above.
Each line represents one track. You give each track a instrument (program), and what gesture set and timing ruleset to use.
The CND infographic above does a good job explaining all the functions, but they'll be explained again down here.
br>
In the top left corner are three important values:
- The first value is the swing time.
1Eis 1/16th swing, while3Cis 1/8th swing. If your song is below 100bpm, you might want to use1E. If its faster, try3Cinstead. - The second value is the tempo, in hex.
- The third value is how many tracks there will be, in hex.
Each column explained:
- 1: Initial delay. How many beats until this track starts running. In the vanilla game, you can notice how some song's melodies do not immediately begin playing upon the start of level. This is useful for that; ease the listener into the music.
- 2: Text string. You can make this say whatever you like. Useful for keeping track of what you want each track to be, like "Melody", "Trumpet", "MelodyA"/"MelodyB", "Bass", or "Drums"
- 3: Track copy. Select a previous track # to copy the gestures from. If the track its copying plays "gesture 3", this track will play also "gesture 3". Often used for treasure mix instruments. Be sure to use the same timing ruleset.
- 4: Echo strength.
- 5: If set to 1, the values in this track's timetable will always be played in order, in a loop. If set to 0, it will randomly select values from its timetable, thus, allowing you to randomize when gestures play.
- 6: Bank number.
- 7: Program number.
- 8: Gesture set, select the set # you want to use from the BMS.
- 9: Timing ruleset, select the set # you want to use from the BMS.
- 10: How many gestures this track will play, before playing "silent gestures". Linked to below. These function as a sort of on/off cycle.
- 11: How many "silent gestures" this track will play, before playing normal gestures. Linked to above. These function as a sort of on/off cycle.
- 12: If notes are being transposed down (see below), this is set to FF. But this column doesn't actually do anything, so you don't need to edit this.
- 13: Transpose all notes played by this track. To transpose up, use values 1-127. To transpose down, use the sign 2 compliment (values 128-255).
- 14: Volume.
- 15: Stereo panning.
- 16: If set to 1, all gestures will be delayed by 1/2 a beat.
Some considerations:
- You can use the on/off cycle feature (column 10 and 11) to make your melodic instrument take a "break" every once in a while. You can have it play 4 gestures, but then be silent for 2.
- If your timing ruleset is strict (the timings for when gestures occur is always consistent), something fun to try is to have the melody be a back-and-forth between two different instruments. Set the initial delay for the second instrument to be longer than the first one, and then cleverly use the on/off cycle. This is done for the melody in the Bulblax Kingdom, and Frontier Cavern.
- If you are using the "track copy" feature (column 3), you can have the primary instrument play a melody, and have this instrument always play chords that perfectly match that melody.
- The half-beat delay achieved with column 16 can be used to make one instrument "echo" another, if each instrument is the same and "track copy" is on.
Mapping the tracks
With all that done, don't forget to edit the song's trackMap! Edit your song in the trackMap files in either /user/Totaka or /user/Wakai, and set how many instruments will be in each mix. It goes in order from: Main Mix, Task (event), Treasure (otakara), Enemy near (kehai), Combat mix, and Spiderwort mix (ground). Although you cannot find Spiderworts underground, you will have to sacrifice at least one track for that mix. You cannot set any of the mixes to have 0 instruments in them.